An Easter celebration is not complete without beautifully colored eggs. They are easy to make, and the process is rather fun! I enjoy having a few around during Easter, they are great decorations and look so much better than the plastic ones.
After some research, I found two different techniques to try for dying Easter eggs. The great news is, you likely already have all the ingredients you need to get started! I found the techniques below from Martha Stewart’s website, (Real Simple) while the techniques were easy, they did take some time to egg-za-cute. But don’t let that intimidate you – start creating!
Do you also love dyeing eggs the traditional way? Share your favorite Easter egg dyeing techniques below in the comments!
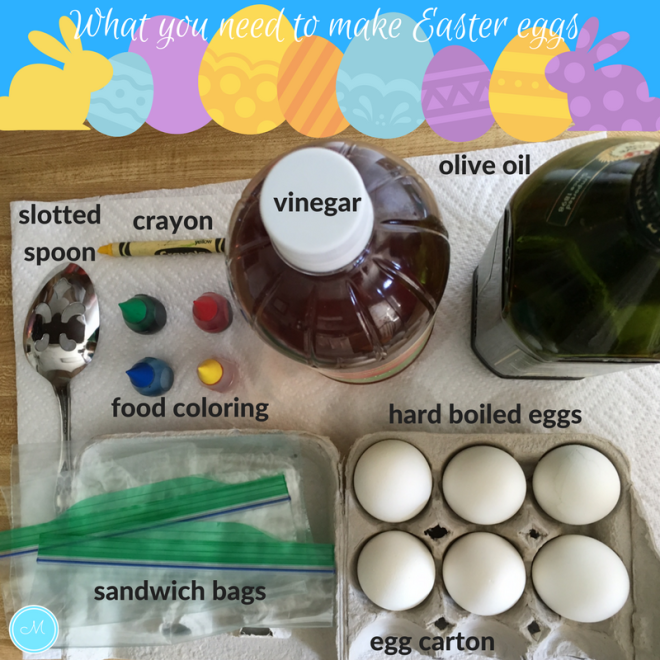
1.Traditional – Need: Hard boiled eggs, food coloring, boiled water, vinegar, slotted spoon and egg carton.
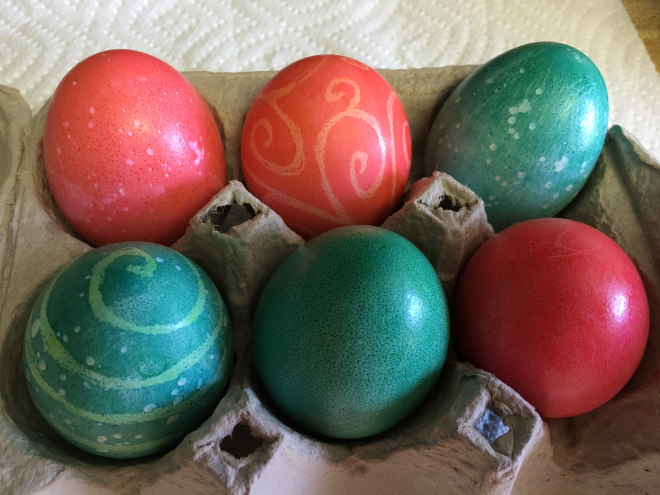
This method is very easy. Just boil 1/2 cup of water, add teaspoon of vinegar (can be apple cider, like I used). Then add food coloring into a bowl. For the blue green color, I added 15 drops of green and 5 drops of blue. For the pink/red color I added 20 drops of red food coloring. Next, place a hard boiled egg into the mixture. For a lighter color, only dye for about 2-3 minutes, for the darkest color dye for 5 minutes. Place into carton for drying.

2. Wax designs – Need: Everything listed in traditional plus: wax crayon, foil, and cookie sheet.
NOTE: This method takes the most time because of the designs, but if you have older kids helping I’m sure it could go much faster. With the wax designs you can create some very intricate eggs, or keep it simple. It’s your call – have fun with it!
Heat oven to 225 degrees.
Begin making a light color dye on a hard boiled egg as outlined above in the traditional technique. Once dried, draw designs onto the egg with the crayon. Keep in mind, wherever you draw with the crayon, it will reveal the lighter color later. Place the egg back into the same color dye for about 5 minutes. Let the egg dry in the carton. Once the egg is completely dry, place on a cookie sheet lined with foil, and place into the oven. After about 5 minutes, take the egg out, and gently rub off the crayon wax.

3. Speckled – Need: Everything listed above in traditional plus: olive oil, sandwich plastic bag, foil, and cookie sheet.
NOTE: This method is really fun, but I found that some of the eggs responded to the treatment better than others. If you are looking for a fun, rustic look, use this technique.
Heat oven to 225 degrees.
Again, begin making a light color dye on a hard boiled egg as outlined above in the traditional technique. Once dried, place about a teaspoon of olive oil into a plastic bag, and then place the egg into the bag, coating the entire surface of the egg with olive oil. Next, place the egg into the same color dye. Let dry. Place eggs onto foil covered cookie sheet and place in oven for about 5 minutes. When the eggs start sweating, take them out, and gently dab them with a paper towel.